You are here: Configuration > Transactions > Transaction Levels in OICE
Oracle® Insurance Rules Palette 9.7.0.0 E51103-01
Transaction Levels in OICE
Transactions can be processed at various levels in OICE. There are several factors that determine the level an activity can be processed at in the application. The steps required for configuring activities at the various levels are defined below.
Company-Level Transaction
These transactions process against all policies in a company. They are accessed in OICE from the Company Main Menu option.
Steps to Configure a Company Level Transaction
- Navigate to the Main Explorer tab.
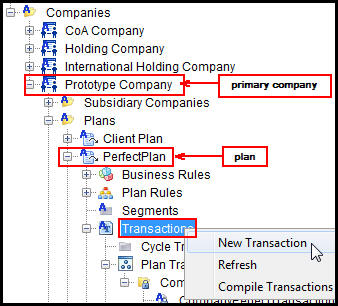
- Open the Primary Company folder for the company the transaction will process against.
- Open the Plans folder.
- Click the plan the transaction will belong to, or create a new plan.
- Open the plan and right-click the Transactions node.
- Click New Transaction.
- Follow the normal transaction creation steps, EXCEPT select Plan- for the transaction type.
- Check in the transaction and add at least one translation when the translation window displays. A transaction must have at least one translation or it will not display in OICE.
- Navigate to the Admin Explorer tab.
- Open Security | Application Security | Security Group | Name of Security Group | Transaction Security | Name of Company | Plan.
- Double-click the Plan node, under which the transaction will display.
- Check out the transaction and add security.
- Check in the transaction. The transaction can now be viewed in OICE from the Company screen.
Company Level Transactions
Client-Level Transaction
These transactions process against all clients in a company. They are accessed in OICE from the Client Main Menu option.
Steps to Configure a Client Level Transaction
- Navigate to the Main Explorer tab.
- Open the Primary Company folder for the company the transaction will process against.
- Open the Plans folder.
- Open the appropriate plan and right-click the Transactions node.
- Click New Transaction.
- Follow the normal transaction creation steps, EXCEPT select Client- for the transaction type.
- Check-in the transaction and add at least one translation when the translation window displays. A transaction must have at least one translation or it will not display in OICE.
- Navigate to the Admin Explorer tab.
- Open Security | Application Security | Security Groups | Name of Security Group | Transaction Security | Name of Primary Company | Name of Plan.
- Double-click the Plan node, under which the transaction will display.
- Check out the transaction and add security.
- Check in the transaction. The transaction can now be added in OICE from the Client screen.
Policy-Level Transaction
These transactions process against a given policy. They are accessed in OICE by selecting a policy and clicking Activities in the left navigation menu.
Steps to Configure a Client-Level Transaction
- Navigate to the Main Explorer tab.
- Open the Primary Company | Subsidiary Company folder for the company the transaction will process against.
- Open the Plans folder.
- Open the appropriate plan and right-click the Transactions node.
- Click New Transaction.
- Follow the normal transaction creation steps, EXCEPT select Policy- for the transaction type.
- Check in the transaction and add at least one translation when the translation window displays. A transaction must have at least one translation or it will not display in OICE.
- Navigate to the Admin Explorer tab.
- Open Security | Application Security | Security Groups | Name of Security Group | Transaction Security | Name of Subsidiary Company | Name of Plan.
- Double-click the Plan node and the transaction will display.
- Check out the transaction, assign it a state context and add security.
- Check in the transaction. The transaction can now be added in OICE from the Activities screen.
Plan-Level Transaction
These transactions process against a given plan. They are accessed in OICE by clicking the Plan Main Menu option and selecting Plan Activities.
Steps to Configure a Client-Level Transaction
- Navigate to the Main Explorer tab.
- Open the Primary Company | Subsidiary Company folder for the company the transaction will process against.
- Open the Plans folder.
- Open the appropriate plan and right-click the Transactions node.
- Click New Transaction.
- Follow the normal transaction creation steps, EXCEPT select Plan- for the transaction type.
- Check in the transaction and add at least one translation when the translation window displays. A transaction must have at least one translation or it will not display in OICE.
- Navigate to the Admin Explorer tab.
- Open Security | Application Security | Security Groups | Name of Security Group | Transaction Security | Name of Subsidiary Company | Name of Plan.
- Double-click the Plan node and the transaction will display.
- Check out the transaction and add security.
- Check in the transaction. The transaction can now be added in OICE from the Plan Activities screen.
Copyright © 2009, 2013, Oracle and/or its affiliates. All rights reserved. Legal Notices